Guide: Remote SSH Access For IoT Ubuntu Devices - Securely!
Are your IoT devices exposed to the vulnerabilities of the open internet? Ensuring secure remote access to your IoT devices, especially when using Ubuntu Server, is non-negotiable in today's threat landscape. This article dives deep into the practical aspects of setting up SSH for secure remote management of your IoT fleet.
The proliferation of Internet of Things (IoT) devices has brought about unprecedented connectivity and automation. However, this interconnectedness also introduces significant security challenges. Remotely accessing and managing these devices is often a necessity, and doing so securely is paramount. SSH (Secure Shell) provides a robust and time-tested method for establishing secure, encrypted connections. This is especially crucial when utilizing Ubuntu Server, a popular and versatile operating system for IoT applications. Configuring SSH properly safeguards sensitive data transmitted between your management systems and remote IoT devices. This article provides a comprehensive walkthrough, covering setup, configuration, and troubleshooting, to ensure your IoT infrastructure remains secure and manageable.
| Topic | Details |
|---|---|
| Concept | Remote access to IoT devices through SSH on Ubuntu Server |
| Importance | Securing IoT devices in remote locations, preventing data interception, ensuring secure access through authentication, and providing a secure channel for file transfers and remote commands. |
| Technology | SSH (Secure Shell), Ubuntu Server |
| Key Steps | Enabling SSH service, generating keys, and securing the connection. |
| Benefits | Encryption of data, user authentication, secure file transfers, and remote command execution. |
| Applications | IoT applications requiring remote management and secure communication. |
| Resource | Ubuntu Server Official Website |
Setting up SSH on IoT devices running Ubuntu involves a series of well-defined steps. The initial configuration is relatively straightforward, but securing the connection requires careful consideration of best practices. We will address both the initial setup and advanced security measures.
- Vegamovies Discover The Future Of Entertainment Year Trends
- Corinna Jagger The Untold Story Of Mick Jaggers Daughter
First, ensure Ubuntu Server is installed and properly configured on your IoT device. This includes setting up a static IP address (recommended for stable remote access) and configuring basic networking. Once Ubuntu is up and running, the core of enabling SSH lies in installing and configuring the `openssh-server` package.
Open a terminal window on your IoT device, either directly or through a local console connection. Then, execute the following command to install the SSH server:
sudo apt update sudo apt install openssh-server The `apt update` command refreshes the package lists, ensuring you download the latest version of `openssh-server`. The `apt install openssh-server` command then downloads and installs the SSH server and its dependencies. Once the installation is complete, the SSH service should start automatically. You can verify its status using the following command:
- Carly Jane Onlyfans Leak The Full Story What It Means
- Fix We Did Not Find Results Plant Growth Tips More
sudo systemctl status ssh The output should indicate that the SSH service is active and running. If it's not, you can start the service manually:
sudo systemctl start ssh While the SSH server is now running, the default configuration allows password-based authentication, which is inherently less secure. The next crucial step is to disable password authentication and enable key-based authentication. This involves generating an SSH key pair on your client machine (the computer you'll be using to connect to the IoT device) and copying the public key to the IoT device.
On your client machine (e.g., your laptop), open a terminal and generate an SSH key pair using the following command:
ssh-keygen -t rsa -b 4096 This command generates an RSA key pair with a key size of 4096 bits, providing a high level of security. You'll be prompted to enter a file in which to save the key (the default is `~/.ssh/id_rsa`) and a passphrase. It's strongly recommended to use a passphrase to protect your private key, even if someone gains unauthorized access to it. If you choose to use a passphrase, you'll need to enter it every time you use the key to connect to the IoT device.
Once the key pair is generated, you'll have two files in the `~/.ssh` directory: `id_rsa` (the private key) and `id_rsa.pub` (the public key). The next step is to copy the public key to the IoT device. There are several ways to do this, but the simplest is often using the `ssh-copy-id` command:
ssh-copy-id username@iot_device_ip_address Replace `username` with your username on the IoT device and `iot_device_ip_address` with the IP address of your IoT device. You'll be prompted for your password on the IoT device. The `ssh-copy-id` command will append the contents of `id_rsa.pub` to the `~/.ssh/authorized_keys` file on the IoT device. If the `~/.ssh` directory doesn't exist on the IoT device, it will be created. If the `authorized_keys` file doesn't exist, it will also be created.
If `ssh-copy-id` is not available, you can manually copy the public key. First, display the contents of the public key file:
cat ~/.ssh/id_rsa.pub Copy the entire output (including the `ssh-rsa` prefix and your username or hostname at the end). Then, connect to your IoT device using SSH with password authentication (you'll disable this later):
ssh username@iot_device_ip_address Once logged in, create the `~/.ssh` directory (if it doesn't exist) and the `authorized_keys` file:
mkdir -p ~/.ssh chmod 700 ~/.ssh touch ~/.ssh/authorized_keys chmod 600 ~/.ssh/authorized_keys Then, paste the public key you copied earlier into the `authorized_keys` file using a text editor like `nano` or `vim`:
nano ~/.ssh/authorized_keys Paste the public key into the file, save, and exit the editor.
Now that the public key is copied to the IoT device, you can disable password authentication. This is done by editing the SSH server configuration file, `/etc/ssh/sshd_config`. Open the file with root privileges:
sudo nano /etc/ssh/sshd_config Find the line `PasswordAuthentication yes` and change it to `PasswordAuthentication no`. Also, find the line `ChallengeResponseAuthentication yes` and change it to `ChallengeResponseAuthentication no`. If these lines are commented out (preceded by a `#`), uncomment them by removing the `#` and then make the changes. Finally, to further enhance security, consider changing the default SSH port (22) to a non-standard port. Find the line `#Port 22` (or `Port 22` if it's not commented out), uncomment it (if necessary), and change the port number to something between 1024 and 65535 that is not commonly used.
After making these changes, save the file and restart the SSH service:
sudo systemctl restart ssh Now, try connecting to your IoT device from your client machine:
ssh username@iot_device_ip_address -p your_new_port If you changed the SSH port, remember to include the `-p` option followed by the new port number. If you set a passphrase for your SSH key, you'll be prompted to enter it. If everything is configured correctly, you should be able to connect to your IoT device without being prompted for a password.
However, setting up key-based authentication and disabling password authentication is only the beginning. To truly secure your SSH connection, consider implementing the following additional security measures.
Firewall Configuration: Use a firewall like `ufw` (Uncomplicated Firewall) to restrict access to the SSH port. Only allow connections from specific IP addresses or networks that you trust.
sudo apt install ufw sudo ufw allow your_new_port/tcp sudo ufw enable sudo ufw status Replace `your_new_port` with the actual port number you configured for SSH. Also, consider adding rules to allow only specific IP addresses or ranges:
sudo ufw allow from 192.168.1.0/24 to any port your_new_port proto tcp This allows connections only from devices on the 192.168.1.0/24 network.
Fail2ban: Install Fail2ban to automatically block IP addresses that repeatedly fail to authenticate. This helps protect against brute-force attacks.
sudo apt install fail2ban Fail2ban is usually configured to protect SSH by default. You can customize its configuration in the `/etc/fail2ban/jail.local` file. For example, you can adjust the `bantime`, `findtime`, and `maxretry` parameters to control how long an IP address is banned, how long Fail2ban monitors for failed login attempts, and the maximum number of failed attempts allowed before a ban is imposed.
Regular Updates: Keep your Ubuntu system and SSH server up to date with the latest security patches. Use the following commands to update your system:
sudo apt update sudo apt upgrade
Disable Root Login: Prevent direct SSH login as the root user. This forces attackers to first gain access as a regular user and then attempt to escalate privileges, adding an extra layer of security. In the `/etc/ssh/sshd_config` file, set `PermitRootLogin no`.
Use Strong Passphrases: If you choose to use passphrases for your SSH keys, make sure they are strong and complex. A strong passphrase should be at least 12 characters long and include a mix of uppercase and lowercase letters, numbers, and symbols.
Monitor SSH Logs: Regularly monitor the SSH logs for suspicious activity. The logs are typically located in `/var/log/auth.log`. Look for failed login attempts, unusual connection patterns, or other anomalies.
Key Rotation: Periodically rotate your SSH keys to minimize the impact of a compromised key. Generate a new key pair and update the `authorized_keys` file on your IoT device. Then, remove the old key from the `authorized_keys` file and delete the old key pair from your client machine.
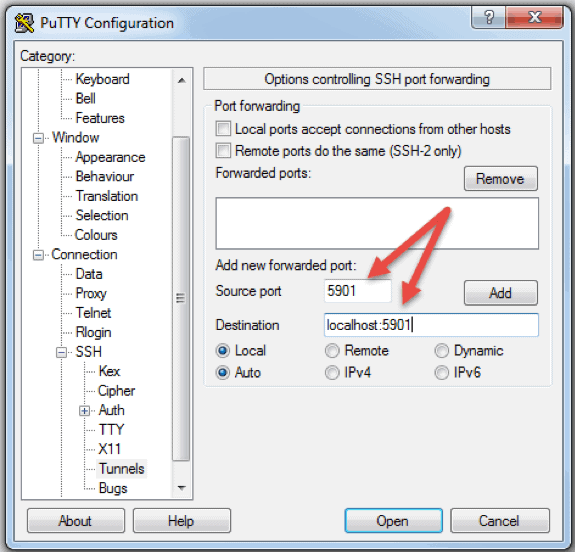
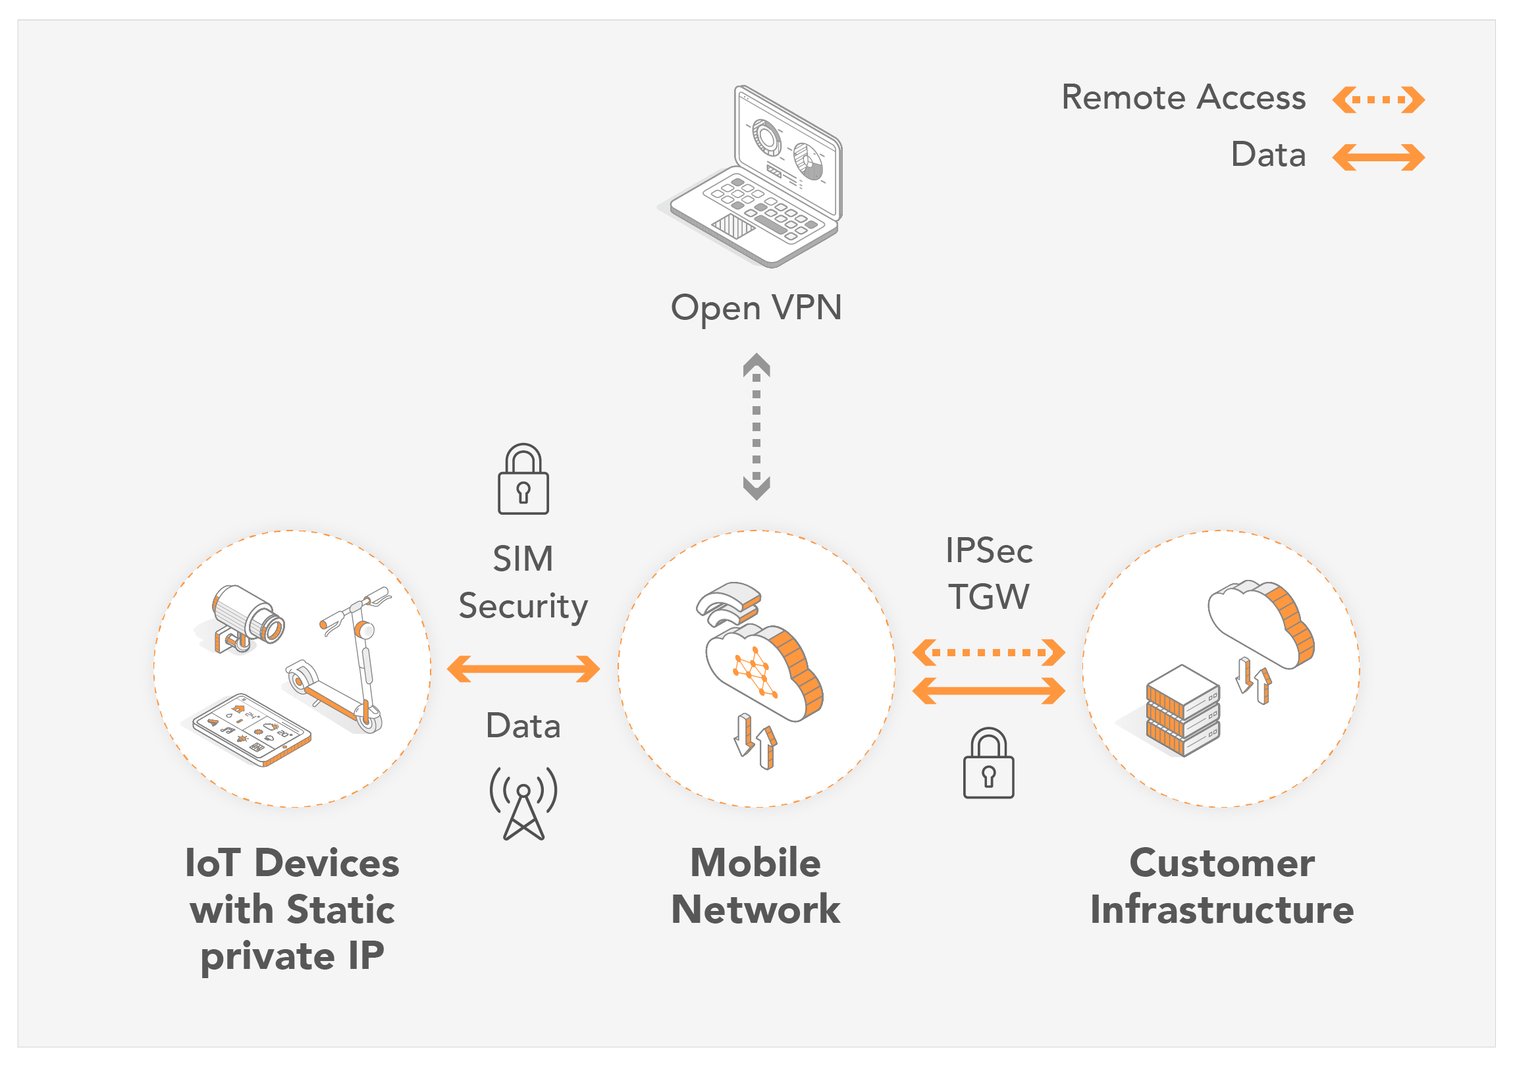
Consider VPN: For highly sensitive applications, consider using a VPN (Virtual Private Network) to create a secure tunnel between your client machine and your IoT device. This adds an extra layer of encryption and authentication, further protecting your data.
Address Common Issues: One common issue is a "Permission denied (publickey)" error when attempting to connect using SSH. This typically indicates a problem with the key-based authentication configuration. Double-check that the public key is correctly copied to the `~/.ssh/authorized_keys` file on the IoT device, that the permissions on the `~/.ssh` directory and `authorized_keys` file are correct (700 and 600, respectively), and that the `sshd_config` file is configured to allow public key authentication and disallow password authentication. Another common issue is being unable to connect after changing the SSH port. Make sure you have opened the new port in your firewall and that you are using the `-p` option with the correct port number when connecting.
Securing remote access to your IoT devices running Ubuntu Server requires a multi-faceted approach. By implementing key-based authentication, disabling password authentication, configuring a firewall, using Fail2ban, keeping your system updated, and following other security best practices, you can significantly reduce the risk of unauthorized access and protect your sensitive data. Remote access iot devices through ssh ubuntu server is paramount, remember that ongoing vigilance and proactive security measures are essential to maintain a secure IoT environment.
This comprehensive guide has equipped you with the knowledge and practical steps necessary to establish secure remote SSH access on your Ubuntu-based IoT devices. You are now prepared to streamline your IoT projects, maintain secure connections, and navigate potential troubleshooting scenarios with confidence. The power to manage and protect your connected world is now in your hands. Embrace the future of secure IoT management and reap the rewards of a robust and resilient infrastructure.
- Noah Film Cover Finde Entdecke Bioseiten Und Mehr
- Stephon Marburys China Move From Nba Star To Cba Legend Amp Salary

ASUS IoT and Canonical partner on Ubuntu Certification for IoT
How to Connect to a Remote Server via SSH from Windows, Linux, or Mac
How remote device access helps IoT businesses emnify Blog
